How to Create a Blog in WordPress Step by Step
I this article I will walk you through the process of setting up and optimizing a WordPress blog, step by step. However let’s first consider the possible benefits of having an outstanding blog.
- Business networking – If you use your blog as a showcase for your professional skills, it may open doors and build business relationships that you can only dream of.
- Ongoing income – Blogs are great at attracting traffic, traffic that you can turn into dollars through advertising. I make a steady flow of money from posts that I wrote years ago.
- Capital gains – Many WordPress blogs sell for tens or even hundreds of thousands of dollars every day. Like with selling other businesses the income from capital gains is taxed at a lower rate than normal income.
- You may enjoy blogging – I wouldn’t say I love writing blog posts, but I certainly like doing it. Writing changes up what I am doing and it also lets me wrap my mind around some important concepts.
- It definitely improves your writing and communication skills.
Why WordPress?
WordPress is the most popular blogging platform with over 60 million websites (half of the websites on the internet) using it. The reasons for WordPress’s popularity is that it is powerful, easy to use and free.
The first mistake
The first mistake new bloggers make is to cheap out on hosting. The problem with cheap hosting is that hosting companies make it cheap by putting a lot of sites on each server. That makes the websites very slow. The search engines don’t like sending traffic to slow blogs and people don’t like browsing on them.
You can avoid the mistake by hosting your blog with one of the larger more established web hosts.
2 Types of hosting you need to understand
The 2 types of hosting are domain and web hosting. The domain hosting just maps your domain name (for example enfuzed.com) to your web hosting where you have your blog installed. Domain hosting is cheaper than web hosting (around $13 per year).
Picking a Domain Name
Don’t use more than 3 words in the domain name, it makes the domain hard to remember and too long. If you are doing a blog for a business, BusinessName.com is a good option. If you are the brand (In the same way as say Donald Trump has made himself the brand) YourName.com is a good option.
When it comes to the last part of the domain name I recommend going with .com , .org or .net. Stay away from the stranger ones. Unless it’s a regional website, then use the regional extension.
Strong domain names are memorable, brandable and catchy.
Web Hosting
HostGator link, I do my hosting with HostGator. They have 3 plans to pick from: The Hatchling, Baby and Business plans. I use the Baby plan. With the Baby plan you only pay for web hosting once. So say you have 3 websites, you pay for hosting once and 3 times for domain hosting. It works out much cheaper in the long run. If, however you think you will only ever have one domain the Hatchling plan is cheaper.
To save some money use the coupon enfuzedcoupon, that will give you a 25% discount.
During the checkout process HostGator tries to sell you 3 optional extras:
- Secure and Accelerate Your Site for $1.67 a month. I don’t use that. I do not really think that’s a feature a blogger needs. Maybe if you have some kind of controversial site where someone might try to hack it, to take the site down temporarily, it might be useful?
- Constant Contact. They are an email marketing business. I am in favor of having an email list of subscribers. Constant Contact is however not the business that I use or recommend for that.
- Daily Site Backup for $19.95/yr. I backup my own stuff. Backing up your blog regularly is very important, but not difficult to do yourself. If you want to save the time, using this service is a good idea.
cPanel
 cPanel is what you use to manage your website. Once your account is setup, log into your cPanel. Click on the QuickInstall button under the Software/Services section.
Next click on the WordPress tab. There are some paid options to have someone install WordPress for you. Ignore that, find the “Install WordPress for Free” part and click on ‘Install WordPress’.

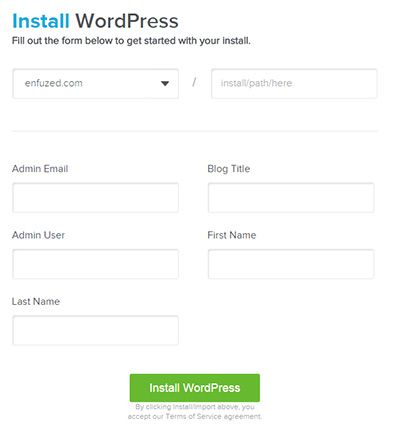 Then you will see the form to the right:
You select your domain name from the drop-down list. The box next to that shows the folder in which WordPress will be installed. If you want people to see your blog, when they enter your site, just leave that blank. Certain notifications will be sent to your Admin Email address. It is also what you use to reset your password, if you forget it. Your Admin User is the name that will be shown as the author on all the posts that you write. You can change it later if you need to. After installation HostGator will try to sell you on a premium theme, ignore that and go to your email box. Log into your administration account from there, using the password that WordPress created for you.
Optimizing WordPress
Permalinks
Say you have the web address http://enfuzed.com/how-to-research-a-competitor-online/ your permalink settings determines the last part “how-to-research-a-competitor-online”. You want to setup your permalinks first, because if someone links to a page and you change the permalink settings that link will point to an error page.
Per default your post permalink contains the date of the post and the post name. I prefer to only have the post name in my permalinks. To change it select ‘Settings’ >> ‘Permalinks’ from the menu. Click on the ‘Post name’ radiobutton and click on ‘Save Changes’.

Plugins
Plugins are an easy way to ad functionality to your blog. There are a lot of good free plugins the problem is that there are also a lot of bad ones. Bad plugins have sloppy script, slow down your blog and possibly even have security holes. When you install WordPress with HostGator it comes with certain plugins pre-installed, so let’s talk about these first.
To view the currently installed plugins select ‘Plugins’ >> ‘Installed Plugins’ from the menu.
- MOJO Marketplace – This plugin just tries to sell you stuff. Click on ‘Deactivate’ to stop it.
- WP Super Cache – This plugin speeds up your site by caching your posts. That sounds good in theory, but the plugin doesn’t always play nice with themes or other plugins. Also if you are setting up your blog some of the changes may not be visible right away. So I would deactivate it initially. Later you can try it and see how it works with your setup.
- Jetpack – Jetpack is a multipurpose plugin. It tracks your traffic and stores the data offsite. The traffic data reports are nice to have. Jetpack also ads some security features to your blog. My favorite Jetpack feature is the social sharing buttons. When you look at a healthy blog, I would expect 33% of the traffic to be from social media sites. Having easy to use social media buttons makes sharing the content much easier. I would prefer it if they focused on fewer features, but regardless you will find some of them useful. To use the plugin you need to open a free WordPress.com account and link it to Jetpack.
- Akismet – Blog post comments are great. They allow your readers to engage with your posts and they also make your posts more attractive to the search engines. The problem is that there a number of bots that try to use your comments to advertise to your readers. Akismet checks comments against its database and filters spam into a spam folder. From there spam is periodically automatically deleted. It makes managing your comments a lot easier. You need to open a free account with Akismet to use their plugin.
To add a new plugin go to ‘Plugins’ >> ‘Add New’. From there you can search for and install new plugins.
- Yoast SEO – SEO is the process of optimizing the visibility of your posts for the search engines. WordPress is pretty good at it, without this plugin, but Yoast SEO takes things even further helping you attract even more search engine traffic.
- Contact Form 7 – This ads a contact form to your blog. The plugin uses a Captcha to protect you from contact form spam.
Themes
Free Themes
Your theme controls what your blog looks like. It would not be very interesting if all blogs looked the same. You can use either a free or paid theme.
To install a free theme go to ‘Appearance’ >> ‘Themes’. Then click on ‘Add New Theme.’ You can do a keyword search and/or use filters to find a theme that works for your site. There are a lot of themes, but eventually you will find a good one.
You should make sure that the theme you pick is responsive. A responsive theme looks good on both a PC screen and on smaller devices like a mobile. You can test a web page to see if it is responsive by using Google’s mobile friendly tool . You can also test a page by reducing the width of your browser window.
Generally these free themes will have a link in the footer to the creator’s website. They use the link as an advertisement for their premium products.
Premium Themes
I use a premium theme on both of my blogs. I bought them on a digital marketplace for themes called themeforest. A premium theme costs around $59, so not cheap. However I do think it was good value for me.
The features good premium themes offer:
- They give you far greater control over every detail of your blog’s design.
- They greatly improved your control over where the ads you use are placed. Making your blog more profitable. You can do testing to see how ads placed on different places attract more or fewer clicks. I have found that ad placement can make a significant difference in click through rates and therefore earnings.
- A good premium theme handles responsiveness much better than a free one does. That means it looks better and is better monetized than a free theme on smaller mobile devices. This is important because more and more people are browsing the internet on mobile devices.
Editing your sidebar
Most themes have a sidebar, normally on the right side of the posts. You can edit and change the order of the elements or widgets in the sidebar. To do so go to ‘Appearance’ >> ‘Widgets’. To add or remove widgets you drag them into and from the Widget Area. You also drag the widgets in the Widget Area to change their order.
Adding content to your Blog
The content on your blog is divided into pages and posts. Examples of pages are your About Me page, Privacy Policy and Terms. Your posts feature your everyday content. When you install WordPress you start out with a ‘Sample Page’ and a ‘Hello world!’ posts. You can edit or delete these.
Pages
To create a new page go to ‘Pages’ >> ‘Add New’ on the left hand menu. That will load an editor page. You can input text and post images in this window.
Add your page to the menu
Steps for adding pages to the navigation bar
- Save changes to the page by clicking the ‘Update’ button
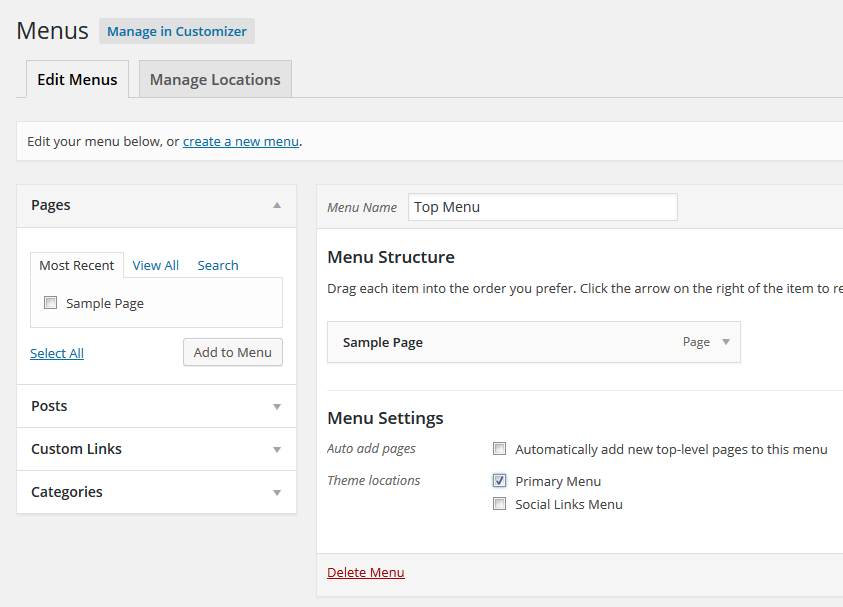
- Click ‘Appearance’ >> ‘Menus’ in the WordPress admin menu
- Now we need to create a menu. Do so by giving the menu a Name for example “Top Menu” then click on ‘Create Menu’.
- Next we add a page to the menu. You should see your page’s name with a checkbox next to it. Select it and then click on ‘Add to Menu’.
- Next you need to attach the menu to a location in the theme. The location options with the default theme is ‘Primary Menu’ and ‘Social Menu’. Then select the ‘Primary Menu’ box and then click on ‘Save Menu’. The menu should then show your page when you open the blog.
Posts
You can create a post in the same way as a page. Because you can have many posts you should organize them into categories. To add a category go to ‘Posts’ >> ‘Categories’.